
Plants
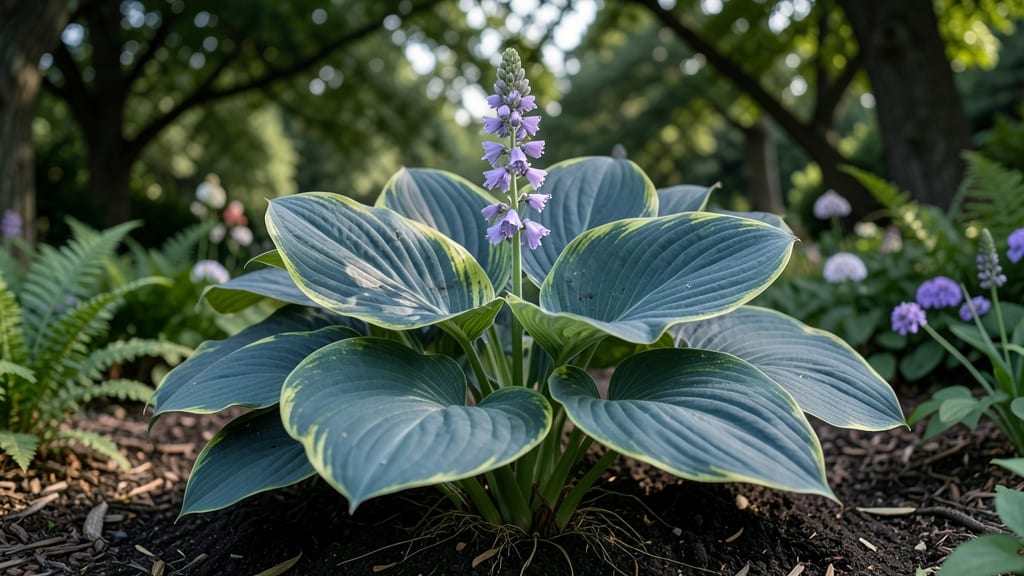
Hostas thrive where most plants struggle—deep shade, damp soil, and cool climates. 🌿 These shade-loving perennials reward patience with bold, textured foliage that stays striking from spring through frost, plus summer blooms that attract pollinators.
My first hosta planted in 2018 now covers an entire garden corner, proving how well they naturalize over time.
The secret to success lies in mimicking their native woodland habitat: rich, well-draining soil with 2-3 inches of organic matter mixed in, and partial to full shade (they tolerate morning sun but avoid hot afternoon rays).
Most varieties grow best in USDA zones 3-9, though some cold-hardy types like 'Blue Angel' survive even in zone 2. Start with a 3-4 inch division or container-grown plant for fastest results.
Once established, hostas demand little beyond consistent moisture (they wilt quickly in dry soil) and annual feeding with balanced fertilizer in early spring. Their slow-spreading rhizomes make them ideal for filling shady spots—just divide clumps every 3-5 years to keep them vigorous.
The payoff? Lush foliage that outshines anything in a sunny border.
For variety lovers, leaf colors range from chartreuse ('Halcyon') to deep blue ('Francee'), with sizes from miniature ('Pandora') to giant ('Sum and Substance'). Pair them with ferns, astilbes, or heucheras for layered shade gardens that thrive with minimal fuss. Here's how to get started right.
📚 In This Guide
- What you need
- Instructions
- Tips and common mistakes
- Wrapping up and next steps
What you need
- ● Hosta plants: Choose 3–5 varieties (e.g., Hosta 'Blue Angel', Hosta 'Francee', or Hosta 'Guacamole' for color diversity). Opt for nursery-grown plants (1–2 gallons in size) or divide mature clumps.
- ● Well-draining potting mix or garden soil: 5–10 cubic feet (for in-ground planting) or 1–2 bags (for containers). Amend with 20% compost for nutrients.
- ● Organic mulch: 2–3 inches of shredded bark, wood chips, or pine straw to retain moisture and suppress weeds.
- ● Watering can or hose with a gentle spray nozzle: Hostas love moisture but hate soggy roots!
- ● Garden trowel or hand shovel: For digging holes (6–12 inches wide/deep, depending on root ball size).
- ○ Gloves (optional but recommended): Protect your hands from soil and sharp mulch edges.
- ● Measuring tape or ruler: Ensure proper spacing (12–36 inches apart, depending on mature size).
- ● Pruners (sterilized): For trimming dead foliage or dividing clumps.
- ● Location: Partial to full shade (2–6 hours of sunlight max). Avoid harsh afternoon sun.
- ● Soil pH: Slightly acidic to neutral (6.0–7.5). Test your soil if unsure—hostas hate alkaline conditions!
- ● Climate: Hardy in USDA Zones 3–9. Cold-hardy varieties (e.g., Hosta 'Halcyon') thrive in cooler regions.
- ● Water source: Consistent access to water (hostas wilt quickly in drought). Drip irrigation or self-watering containers work great!
- ● Slow-release fertilizer: 10-10-10 or balanced organic fertilizer (apply in early spring).
- ● Container garden setup: Large pots (15+ gallons) with drainage holes for urban gardeners.
- ● Decorative rocks or edging: To define garden beds and keep mulch in place.
- ● Shade cloth (for containers): If your hostas get too much indirect light.
Step-by-Step guide to planting hosta perennials for stunning shade gardens
Hostas thrive in shade, but planting them right ensures those bold leaves stay lush year after year.
🌱 Step 1: Choose the Perfect Planting Location
Hostas adore partial to full shade—think 4-6 hours of morning sun or dappled light all day. I always scout the spot first: look for areas where other shade-loving plants already thrive, like ferns or astilbes. Avoid low spots where water pools, as soggy soil leads to root rot.
Test the soil moisture by digging a small hole. If water lingers after 30 minutes, amend with 2-3 inches of compost to improve drainage. Hostas reward patience—plant them where they’ll have room to spread, ideally 2-3 feet apart for medium varieties (smaller types can go 12-18 inches apart).
🪴 Step 2: Prepare the Soil for Healthy Root Growth
Hostas hate compacted or clay-heavy soil. Loosen the top 12 inches of soil with a garden fork, breaking up any hardpan. Mix in 3-4 inches of organic matter—I use a blend of compost and peat moss—to create a loose, moisture-retentive bed. The goal is soil that feels like a damp sponge, not concrete.
For acidic-loving varieties (like ‘Blue Angel’), add a handful of sulfur or pine needles to the hole. Test the pH if unsure—hostas prefer 6.0-7.5. Amend with lime if your soil runs too acidic. A quick finger test: if the soil feels gritty, it’s likely alkaline; if it’s slick, it’s acidic.
☀️ Step 3: Plant Hostas at the Right Depth and Spacing
Dig holes twice as wide as the root ball but only as deep as the container’s base. Hostas hate being buried too deep—the crown (where roots meet stems) should sit just below soil level. Gently remove the plant from its pot, tease the roots if they’re circling, and place it in the hole.
Fill the hole with soil, pressing lightly to eliminate air pockets. Water deeply to settle the roots, then top off with 1-2 inches of mulch (I use shredded bark) to retain moisture and suppress weeds. Space larger varieties 3-4 feet apart—they’ll thank you with wider leaves and fewer crowding issues.
💧 Step 4: Water and Maintain for Year-Round Lushness
Water deeply once a week (or more in extreme heat) to encourage deep root growth. Hostas wilt dramatically when thirsty—don’t wait until leaves droop to water. Aim for 1-1.5 inches of water per week, delivered at the base. Overhead watering can cause fungal issues, so use a soaker hose or watering can.
Fertilize twice a year: once in early spring with a balanced 10-10-10 and again in mid-summer with a slow-release organic fertilizer. Yellowing leaves? Often a sign of nitrogen deficiency—feed again in 4 weeks. Hostas are low-maintenance but reward consistency with bold, vibrant foliage for decades.
✂️ Step 5: Divide and Revitalize Every 3-4 Years
Hostas multiply underground, and clumps become overcrowded after 3-4 years. Dig up the plant in early spring or fall, separate the crowns with a sharp spade, and replant the healthiest divisions. Discard the center—it’s often woody and past its prime. Replant divisions at the same depth, water well, and watch them bounce back with fresh growth.
This is the secret to keeping hostas thriving: divide before they outgrow their space. You’ll end up with more plants for free—and your garden will stay lush without the stress of struggling, crowded foliage.
Tips & tricks for perfect hosta plantings
These insider tricks will help you turn your shade garden into a lush, thriving hosta display that lasts for years.
Soil Prep Secret: The key to happy hostas lies in that 12-inch-deep soil prep in Step 2. I can't stress enough how important it is to break up any hardpan—hosta roots need that loose, well-aerated environment to spread properly. If your soil feels dense like packed clay, consider adding 1-2 inches of coarse sand to the mix. This creates tiny air pockets that prevent root suffocation, especially important for those 3-4 inches of organic matter we're adding. Think of it like giving your hostas a fluffy pillow to nest in.
Lighting Insight: That 4-6 hours of morning sun mentioned in Step 1 is actually a sweet spot—it gives hostas just enough energy without scorching their delicate leaves. Here's what I do: I mark the sunniest spots in my garden with flags at different times of day, then check which areas get morning light only. Hostas in these spots stay vibrant longer because afternoon sun can turn their edges crispy. For full shade spots, look for areas where sunlight barely touches the ground—hostas will reward you with deeper colors.
Mulch Matters: That 1-2 inches of mulch in Step 3 isn't just for looks—it's a game-changer for moisture retention. I use shredded hardwood bark because it breaks down slowly while keeping roots cool. Pro tip: Refresh your mulch every 6 months to maintain that 1-1.5 inches of water per week guideline from Step 4. The mulch acts like a sponge, slowly releasing water to roots exactly when they need it. Plus, it keeps weeds at bay so your hostas don't have to compete for nutrients.
Division Timing: When it comes to that 3-4 year division in Step 5, timing is everything. I always divide in early spring because that's when hostas are just waking up from dormancy. Their energy goes into establishing new roots rather than fighting stress. If you must divide in fall, do it at least 6 weeks before first frost—this gives the plants time to recover before winter sets in. You'll know it's time when you see the center of your hosta clump getting woody and the outer leaves shrinking.
Pro Tips for Hosta Perennial Plants
- These insider tricks will help you turn your shade garden into a lush, thriving hosta display that lasts for years.
- Soil Prep Secret: The key to happy hostas lies in that 12-inch-deep soil prep in Step 2.
- Lighting Insight: That 4-6 hours of morning sun mentioned in Step 1 is actually a sweet spot—it gives hostas just enough energy without scorching their delicate leaves.
Frequently asked questions
How do I know if my hosta is getting enough sunlight?
Hostas thrive in partial to full shade, meaning 2–6 hours of sunlight daily. Too much sun? Look for bleached or crispy leaves. Too little? Slow growth or pale foliage. Test spots in your yard—if nearby plants struggle, your hosta likely needs more shade or protection (like a sheer curtain).
When is the best time to plant hostas?
The ideal window is spring (after last frost) or early fall (4–6 weeks before first frost). Spring planting gives roots time to establish before summer heat, while fall offers cooler temps and moisture. Avoid planting in scorching summer heat—roots can dry out or rot.
Why are my hosta leaves turning yellow or brown?
Yellowing (chlorosis) often signals overwatering, poor drainage, or iron deficiency. Brown edges? It could be sunburn, slug damage, or underwatering. Check soil moisture (hostas like consistently moist but not soggy soil) and inspect leaves for pests. A balanced fertilizer or compost can help revive nutrient-deficient plants.
How do I protect hostas from slugs and pests?
Slugs and snails love hostas! Use organic barriers like crushed eggshells or copper tape around plants. Handpick pests early in the morning. For severe infestations, try iron phosphate-based baits (pet-safe). Planting marigolds or thyme nearby can also deter pests naturally.
Can I grow hostas in containers, or do they need garden beds?
Hostas adapt well to containers (12+ inches deep) if you use well-draining potting mix with compost. Choose compact varieties like 'Blue Mouse Ears' or 'Halcyon'. Water more frequently in pots (they dry out faster) and move containers to shadier spots in summer to prevent leaf scorch.
Pro Tip:
Mulch around hostas with 2–3 inches of organic mulch (like shredded bark) to retain moisture, suppress weeds, and protect roots. Refresh mulch annually for year-round benefits!
Wrapping up and next steps
Hostas are the unsung heroes of shade gardens—easy to grow, stunning year-round, and packed with personality! Whether you're a beginner or a seasoned gardener, these perennials offer low-maintenance beauty with endless color and texture variations. Now’s the perfect time to plant or expand your collection!
Ready to transform your shady spots? Start small—pick one variety to test the waters, or go bold with a mix of heights and hues.
- 🌱 Plan your layout based on size and sunlight needs.
- 💦 Keep soil moist (especially in dry spells).
- 🎨 Experiment! Hostas thrive with companions like ferns and astilbes.