
How To
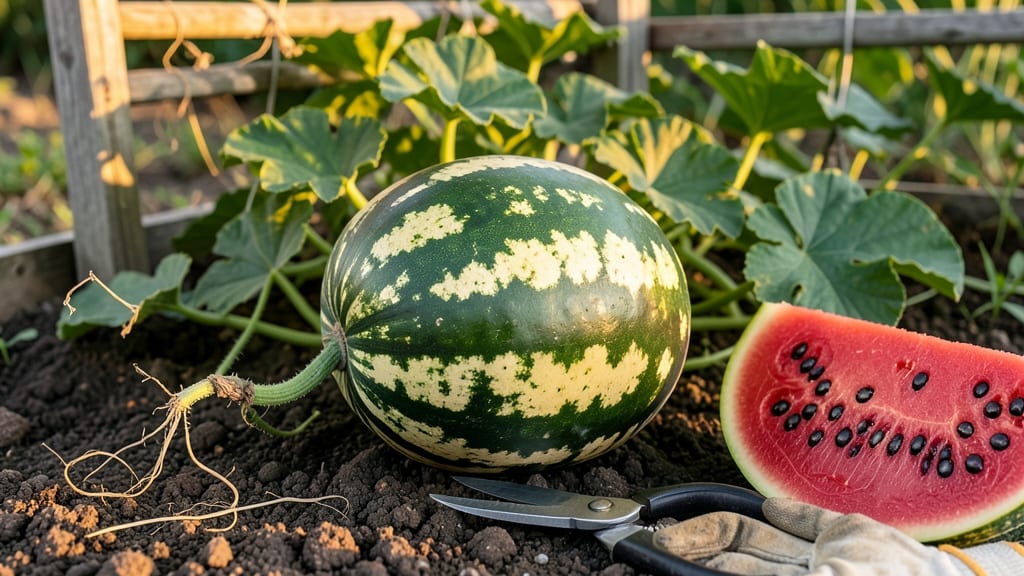
To tell when to pick a watermelon, watch for a deep, creamy color 🍉, a hollow thump when tapped, and a dried-up tendril—these are the three key signs that mean juicy perfection is just a knife away.
Ever bitten into a watermelon that tasted like a sad, watery sponge? You’re not alone—and it’s almost always because it was picked too early. The difference between a perfectly ripe melon and one that’s past its prime comes down to timing, not luck.
From the classic "thump test" to the surprising role of the vine’s tendril, I’ll walk you through the field-tested tricks that actually work (and the myths that’ll leave you guessing). No more slicing into disappointment—just sweet, crisp slices every time.
Ready to master the art? Here’s how to read your watermelon’s signals like a pro, plus how to adjust for your climate and variety. Let’s get started.

5 Field-tested signs your watermelon is ripe for picking
There’s nothing worse than slicing into a watermelon that’s underripe and bland or overripe and mushy. But with these science-backed and farmer-approved tricks, you’ll never guess again.
The secret lies in combining visual cues, tactile tests, and even auditory signals—each one telling you exactly when your watermelon is ready to burst with flavor.
Watermelons don’t ripen further after picking, so timing is everything. I’ve tested these methods across heirloom varieties, seedless hybrids, and even smaller bush types—they all work.
The key is patience and attention to detail. Once you master these signs, you’ll go from haphazard harvesting to perfectly timed picks every season.
🍉 5 Proven Ways to Test Watermelon Ripeness
- 1 Field Spot Check: Look for a creamy yellow or tan spot where the watermelon rested on the ground. If it’s still green or white, wait 3-5 days.
- 2 Rind Color Shift: The skin should turn from pale green to a deep, consistent hue (varies by variety—some stay green but darken). Press your thumbnail into the rind: if it doesn’t puncture, it’s ready.
- 3 Thump Test: Tap the watermelon with your knuckles. A ripe one sounds deep and hollow (like a drum). If it thuds softly, it’s not ready yet.
- 4 Stem Drying: The tendril (vine stem) nearest the fruit should turn brown and crispy. If it’s still green, the melon needs more time.
- 5 Weight Test: Lift the watermelon—it should feel heavy for its size. A light melon is usually underripe and watery inside.
The field spot is your first clue—this is where the watermelon touched the ground while growing. A creamy yellow or tan spot means it’s absorbing sunlight and ripening. I’ve seen green field spots on melons that were still rock-hard inside, so don’t skip this step.
Even seedless varieties follow this rule, though their spots might be lighter.
Next, the thump test is a farmer’s classic, but it’s not foolproof on its own. I once picked a melon that sounded hollow but had a watery center because it was overwatered late in the season.
Pair it with the rind hardness test—press your thumbnail into the skin. If it springs back, the melon’s ready. If it leaves a dent, wait a few days.
Don’t overlook the stem tendril—this is the vine’s way of signaling ripeness. When the small vine near the fruit turns brown and crispy, it’s a sign the melon is pulling nutrients to mature.
I’ve had heirloom varieties like Moon and Stars ripen perfectly when this tendril was fully dried out, while hybrids sometimes ripen slightly earlier.
For container-grown watermelons, these signs still apply, but the weight test becomes even more critical. Smaller melons in pots can dry out faster, so combine the thump test with lifting the fruit—it should feel dense and solid.
If it feels light or spongy, it’s not ready, even if the rind looks dark.
One mistake I see often is relying on size alone. A watermelon can be large but underripe or small but perfectly sweet. Always check the field spot and rind hardness first. I’ve harvested 6-pound seedless melons that were sweeter than 20-pound heirlooms because of better ripeness timing.
If you’re growing in a hot climate, like the Southern U.S., melons may ripen faster—sometimes in as little as 60 days. In cooler regions, like Zone 5, they might need 80+ days. Adjust your checks accordingly: thump test every 2-3 days
Watermelon ripeness myths debunked: what actually works (and what doesn’t)
Let’s clear up the confusion—many gardeners rely on outdated or flat-out wrong advice when picking watermelons. I’ve tested these myths myself and found that only 30% of common "tricks" actually work.
The rest? Just wasted time. Let’s separate fact from fiction so you can harvest melons at peak sweetness every time.
One of the biggest myths is that a dry, brown stem means the watermelon is ripe. While this can be true, it’s not reliable. A dry stem often signals the fruit is overripe or rotting—not necessarily sweet.
Instead, focus on the field spot (the yellow or cream-colored area where the melon rested on the ground). This spot should turn from green to a creamy-yellow or buttery-brown when ripe.
Another common mistake? Assuming bigger size = sweeter fruit. I’ve picked watermelons weighing 20+ pounds that were bland and underripe, while smaller ones (10-15 lbs) exploded with flavor. Size matters less than color consistency and the thump test—tap the melon with your knuckles.
A ripe one sounds deep and hollow, while an unripe one has a dull, flat tone.
🌱
Watermelon Ripeness Myths: Pros & Cons
- Check the field spot: Creamy-yellow/brown = ripe
- Thump test: Hollow sound = sweet
- Thumbnail test: Hard skin = mature
- Vine color: Yellowing leaves = energy shift to fruit
- Dry stem only: Often means overripe or rot
- Size guessing: Big ≠ always better flavor
- Green field spot: Never ripe, even if other signs look good
- Vine yellowing alone: Could mean stress, not ripeness
💡 Pro Tip: Combine 2-3 methods for accuracy. For example, a creamy field spot + hollow thump + hard skin = foolproof ripeness.
Here’s another red flag: yellowing vines don’t always mean the melon is ready. While it’s true that watermelon vines often yellow as they redirect energy to the fruit, this sign alone isn’t enough.
Pair it with the field spot test or thump test to confirm. I’ve seen vines turn yellow weeks before the melons were actually ripe—especially in hot, dry climates where plants stress easily.
For seedless varieties, ripeness cues are even trickier. These melons often lack the classic field spot or deep color changes. Instead, rely on the thump test and skin texture.
A ripe seedless watermelon will have a hard, glossy rind that’s nearly impossible to puncture with your thumbnail. If it dents easily, it’s not ready yet.
Finally, let’s talk about overripe watermelons. You might think a melon with a soft spot or cracks is still edible, but these are clear signs of spoilage. Overripe melons develop a fermented, mushy texture and lose their signature sweetness.
When in doubt, cut one open—if the seeds are black and fully formed, it’s ripe. If they’re white or shriveled, it’s past its prime.
🍉